Git Projects
Last updated: June 1, 2026
This guide covers integrating xltrail with external Git repositories.
If you prefer to learn about setting up a drag-and-drop project, refer to the Drag-and-Drop Projects.
In xltrail-speak, a Git project is a Git repository, owned by you, and hosted on a service like GitHub, Gitlab, Bitbucket or Gitea.
When you set up a Git project in xltrail, you provide xltrail with the url and access token to your repository. xltrail then creates a mirror clone of your repository and keeps it in-sync as you work on your repository.
Create a Git Project via HTTP(S)
On the landing page, click on the + New Project button:

This will open a dialog from where you can select Git Integration and provide the URL, username and token. If possible, generate a read-only token instead of using your regular password. Follow the instructions below for the most popular Git providers.
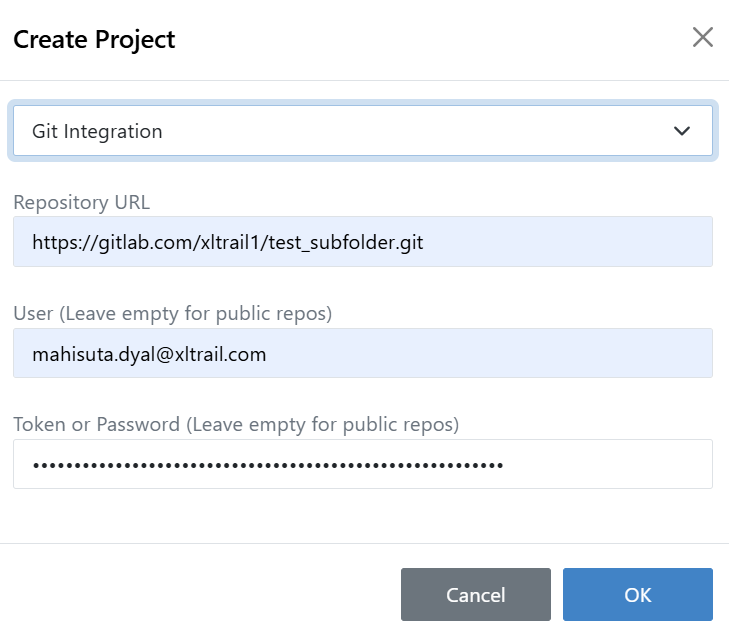
Make sure to paste the HTTP(S) (and not the SSH) version of your Git URL. Also, if your Git provider (e.g. Bitbucket) starts the URL with your username, make sure to remove it including the @. While this should be done automatically by xltrail, it’s good to double-check in case your credentials are not accepted.
Depending on the size of your Git repo, the initial syncing may take anything from a few minutes to a few hours: You will be able to check the progress by clicking the History button in the commit box on the Workbook View.
How to Generate Tokens
Depending on the Git provider you use, the tokens may give you access to a single repository or all repositories that your user can access.
GitHub Cloud & Enterprise
Under Personal settings > Developer settings > Personal access tokens, you can Generate new token. Tick the
repo checkbox so you get access to all the subitems in that box.
If your company is using a Single Sign On (SSO) service like e.g. Okta, you’ll need to make sure to enable your token for SAML, see: https://help.github.com/en/github/authenticating-to-github/authorizing-a-personal-access-token-for-use-with-saml-single-sign-on
GitLab Cloud & CE/EE
You can either use a token that is bound to a specific repository or to your user:
Repository Deploy Token
- This requires at least GitLab 10.7
- The token will give you read-only access to a single repository.
- In your repository, go to
Settings>Repository, thenDeploy Tokens(notDeploy Keys!). Give it aName, checkread_repositoryunderScopesand click onCreate deploy token. It will give you both an automatically generatedusernameandtokenthat you’ll need to use with xltrail.
Personal Access Token
- You will be able to access every repository that you have access to with a personal access token:
- Create a personal access token under
User Settings>Access Tokens. Tick theread_repositorycheckbox underScopes. Use your GitLab username with that token as password in xltrail. If you are on an older version of GitLab, you might not haveread_repositoryavailable. In that case use theapicheckbox.
Bitbucket Cloud
-
Personal Accounts: You can create an app password under
Bitbucket Settings>Access Management>App password. Tick the checkboxesRepository (read)andPull Requests (read). -
Team Accounts: You can create an API key to use with your team name under
Bitbucket Settings>Access Management>API key.
Bitbucket Server
Bitbucket Server (the on-premise version of Bitbucket) introduced personal access tokens with version 5.5, see Bitbucket Cloud above for the details.
On lower versions, you can either use an existing user or create a dedicated xltrail user:
- Log in as Bitbucket administrator
- Under “Administration” click on
Users, thenCreate user - Pick something like
xltrailas the username
To finalize, you need to give this user read access either on Project or Repository level.
.gitignore
Why .gitignore?
By default, Git sees every file in your working directory. This has the ugly side effect that sooner or later you end up with a temporary Excel file under version control.
When you open your Excel workbook Book1.xlsb, Excel creates a temporary file called ~$Book1.xlsb. It should be automatically deleted after the workbook is correctly closed.
Though ~$Book1.xlsb is usually hidden, Git treats it like any other file, unless Git is explicitly instructed to ignore it. This is what .gitignore does: In .gitignore you can list path and file name (patterns) that you want Git to ignore.
Create a .gitignore file
Create a file named .gitignore in the root folder of your repository’s working directory. Add the following content to the .gitignore:
~$*This ensures that Git ignores any file starting with ~$. For a full reference of valid patterns, see https://git-scm.com/docs/gitignore .
Add, commit and push .gitignore like any other file.
git add .gitignore
git commit -m 'Adding gitignore'
git push origin master
Gotchas
If you have already committed a ~$ temporary Excel file, adding ~$* to .gitignore will have no effect. The reason is that files that are already tracked by Git are not affected.
To stop tracking a file that is currently tracked, run
git rm --cached ~$Book1.xlsbto remove ~$Book1.xlsb from the cache (adjust this for your specific file path).
Other ways to ignore temporary Excel files
An alternative approach is to define a global ignore file. If you define your global gitignore patterns in C:\Users\Bjoern\.gitignore_global, you can tell Git with the following command:
git config --global core.excludesfile C:\Users\Bjoern\.gitignore_globalEvery rule which goes into this file applies to every Git repository in your user account. This is especially useful for OS-specific files like .DS_Store on macOS or thumbs.db on Windows.
If you go down this route, remember that every user has to define their global gitignore file as it is not part of the repository.
Git-Based Workflows
For a higher-level view of how xltrail turns pull and merge requests into workbook review workflows, see Git-Based Workflows.